Running a Shopify store means managing dozens of moving parts at once. Inventory dropping below safe levels, high-risk orders coming through, customers hitting spend thresholds that qualify them for different treatment, negative reviews landing that need a fast response. None of it stops.
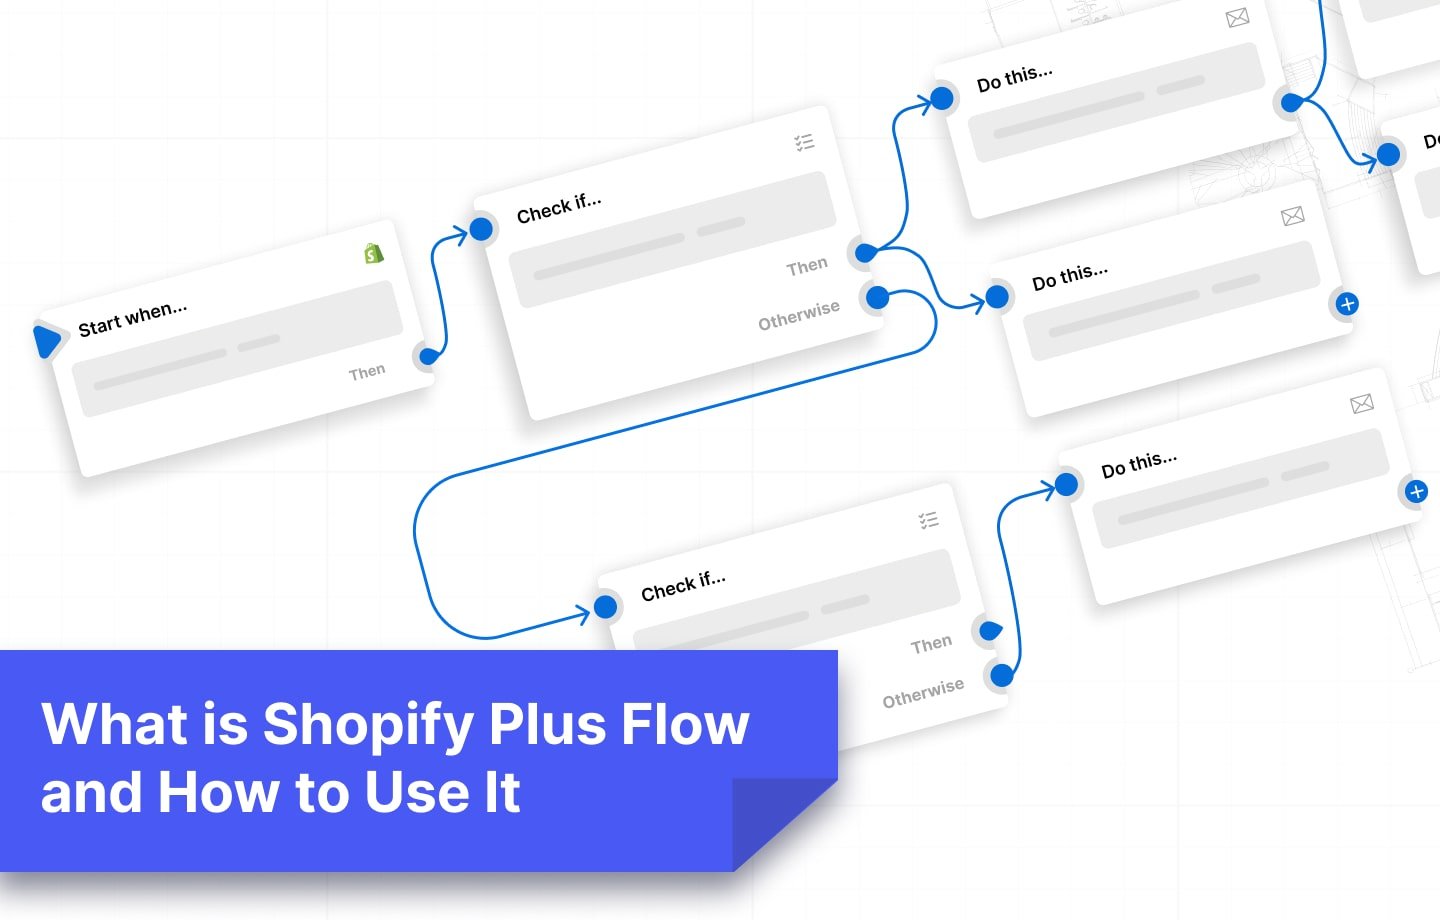
Shopify Flow handles the repetitive end of that work for you. It watches for the events you define, checks the conditions you set, and takes the actions you specify, without anyone on your team needing to catch it first. This guide covers what Shopify Flow is, how the trigger-condition-action logic works, the workflows operators use most, and where it makes a specific difference for B2B and wholesale operations.
What Is Shopify Flow?
Shopify Flow is a free, no-code automation platform built into the Shopify admin. It lets merchants build custom workflows that run automatically when specific events happen in the store, eliminating manual intervention for repetitive processes across orders, inventory, customers, and products.
Flow is available on all Shopify plans, including Basic, Grow, Advanced, and Plus. No coding knowledge is needed to build workflows. You choose from a library of pre-built triggers, conditions, and actions, or build custom workflows from scratch using the visual editor directly in your browser.
How Shopify Flow Works: Triggers, Conditions, and Actions
Every Shopify Flow workflow is built from three components. Understanding how they connect makes the rest of the tool straightforward.
Step 1: Triggers
A trigger is the event that starts the workflow. Shopify Flow watches your store for this event and activates the workflow the moment it occurs.
Default triggers in Shopify Flow include:
- A draft or live order is created
- An order is fulfilled and paid
- A new customer is created
- An order is analyzed for risk
- A refund is issued
- A product is created
- Inventory changes (increases or decreases)
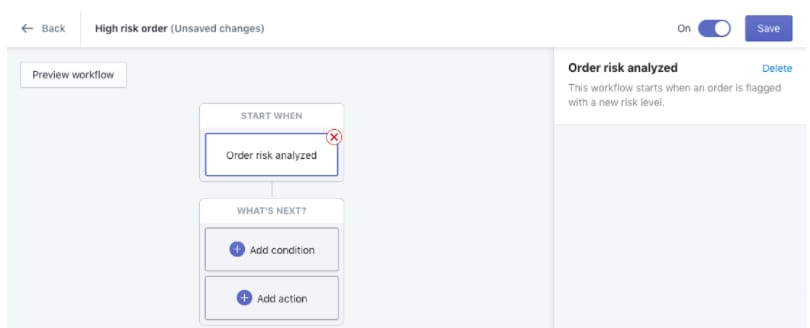
For example, a workflow might trigger any time an order is flagged with a new risk level. The moment that happens, Flow activates and evaluates the conditions you have defined.
Step 2: Conditions

Conditions are the rules that filter the trigger event. Flow checks whether the event meets the criteria you define. If it does, it proceeds to the action. If it does not, it either stops or moves to the next condition.
Shopify provides over 100 pre-designed templates with ready-built condition sets. You can also customize conditions as precisely as your workflow requires.
A practical example: after an order triggers the workflow, Flow checks two conditions:
- Condition 1: The order risk level is high.
- Condition 2: The billing address does not match the shipping address.
Only orders that meet both conditions proceed to the action. Everything else is ignored.
Step 3: Actions

The action is what Flow does when an event meets your conditions. Actions are divided into Shopify-native actions and third-party app actions.
Shopify-native actions cover:
- Customer triggers: update a customer note, add or remove a customer tag
- Product triggers: add or remove a product tag, publish a product, hide a product
- Order triggers: add or remove an order tag, capture payment, archive or unarchive an order, cancel an order
Third-party app actions connect Flow to tools like Slack, Asana, and Google Sheets, letting you push store events into the systems your team already uses.
Using the fraud example: if both conditions are met (high risk + address mismatch), Flow takes two actions:
- Cancel the order
- Add the customer tag "Fraud risk"
That entire process happens without anyone on your team touching it.
How Multiple Conditions and Actions Chain Together
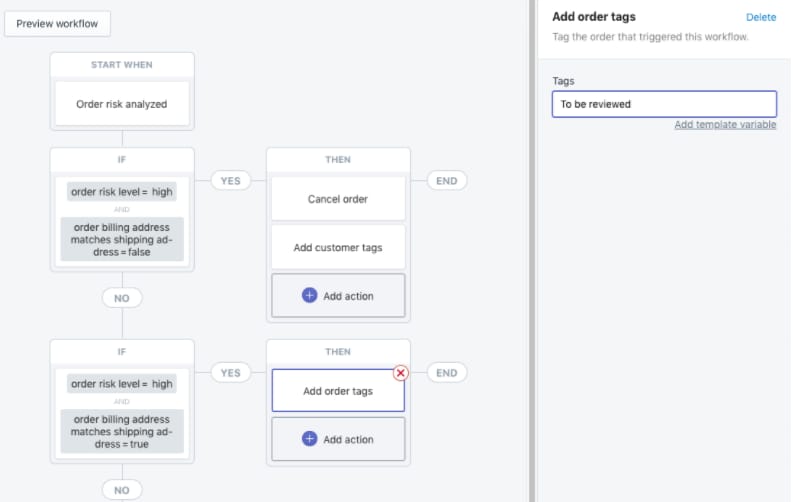
Flow supports branching logic. When a trigger fires, Flow checks Condition 1. If it is met, it runs Action 1. If it is not met, it moves to Condition 2. If Condition 2 is met, it runs Action 2. And so on.
This lets you handle different outcomes from the same event without building separate workflows. For instance, a single order-risk trigger can branch into:
- Condition 1 (high risk + address mismatch) → Action 1: cancel the order
- Condition 2 (high risk + address match) → Action 2: tag the order as "to be reviewed"
If neither condition is met, no action is taken. The workflow sits quietly until the next matching event.
Shopify Flow Workflow Examples
The fraud detection workflow is one of the most common, but it is not close to the only one worth building. Here are two more practical examples that illustrate how the trigger-condition-action logic works across different use cases.
Customer High-Spend Tagging with Slack Notification
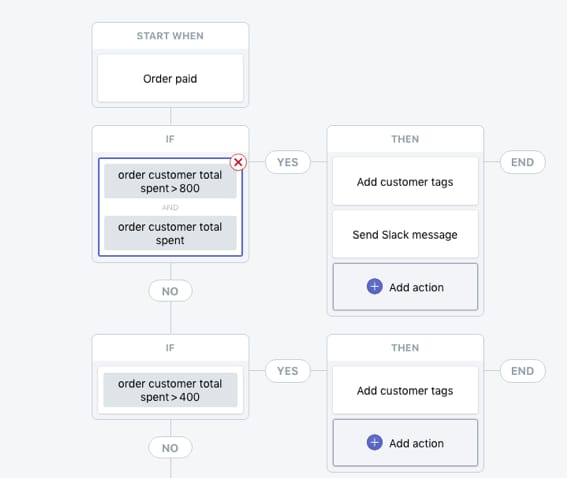
A distributor wants to give personal attention to any buyer who places a large order. The workflow:
- Trigger: An order is created.
- Condition 1: If the customer spent more than $800 on the order, Action 1: Add a customer tag and send a Slack message to the account manager.
- Condition 2: If Condition 1 is not met, and the customer spent more than $400, Action 2: Add a customer tag for marketing segmentation.
The account manager gets notified automatically for high-value orders. Smaller but still above-threshold orders get tagged silently for follow-up campaigns. No one has to manually review order totals.
Low-Inventory Urgency Tag on Product Listings
A retailer wants to create urgency on products running low. The workflow:
- Trigger: Inventory quantity changes on a product variant.
- Condition: If the inventory quantity drops below the threshold you define (for example, five units remaining).
- Action: Add a product tag such as "Few pieces remaining" that your theme uses to display a scarcity message on the product page.
When inventory recovers above the threshold, a second workflow removes the tag. The message appears and disappears automatically based on real stock levels.
Shopify Flow for B2B: Workflows That Matter for Wholesale Operations
Standard ecommerce automation handles orders, inventory, and customer tagging well. B2B and wholesale operations have additional requirements that Flow also covers, and this is where the tool earns more of its value for distributors and manufacturers.
B2B Portal Access Automation. When a new company account is approved in Shopify B2B, Flow can automatically send the buyer an invitation to the portal and notify the assigned sales rep. Without automation, that two-step process often falls through the cracks during onboarding.
Net Terms Order Tagging for Finance. When a B2B buyer places an order on net payment terms, Flow can tag the order with the payment terms type (Net 30, Net 60) and trigger a notification to your finance team. This keeps your accounts receivable process in sync with Shopify without manual review.
Regional Sales Rep Routing. When a B2B order comes in from a specific geographic region, Flow can tag the order with the region identifier and send a notification to the assigned sales rep. Reps get order alerts for their accounts without checking a shared inbox.
Wholesale Order Identification. When an order is placed through a B2B company account, Flow can automatically apply a wholesale tag, add the order to a fulfillment workflow designed for bulk orders, and trigger any back-office notifications your process requires. B2B and DTC orders stay separated by tag from the moment they land.
Restock Notification to Suppliers. When inventory on a key wholesale product drops below your safety stock level, Flow can send an automated note to the relevant supplier contact. Distributors running thin on fast-moving SKUs can automate the reorder signal without setting calendar reminders.
These workflows do not require a developer. They are configurable in the same visual editor used for any other Flow automation. As a Shopify Platinum Partner with 380+ B2B builds, Uncap builds and configures these Flow workflows as part of our Shopify B2B upgrade engagements, alongside the broader platform setup. The automation layer is often where the operational efficiency gains are clearest.
Most Common Shopify Flow Workflows by Category
Here is a reference for the workflows operators use most across the main categories:
Inventory
- Remove out-of-stock products from your storefront automatically until they can be restocked, then republish when inventory is replenished
- Tag products that drop below a low-stock threshold for internal visibility
- Send automated notes to suppliers or relevant departments when inventory falls below a defined minimum
Loyalty and Promotions
- Set up automated reminders to reach out when customers make purchases above a certain value
- Monitor how a specific discount code is being applied and flag unusual usage patterns
Customers
- Add customer tags based on email domain, postal code, shopping behavior, or IP address
- Categorize customers by lifetime spend value for segmentation
- Flag customers who make repeated large refunds for account review
Orders
- Add gift card tags to paid orders automatically
- Send internal notifications when orders come in above a defined value threshold
- Notify relevant departments when orders are placed or refunded based on product category or order type
Products
- Add newly created products to specific collections based on keywords in the product title
- Remove products from active collections when inventory reaches zero
Adding Third-Party App Connectors to Shopify Flow
Shopify Flow connectors extend the action layer beyond Shopify-native events and into the apps your team already uses. Third-party connectors let you trigger actions in external tools based on what happens in your Shopify store.
Some of the most useful connector-based workflows for ecommerce and B2B operators:
Review management with Stamp.io or Yotpo. When a negative review is submitted through your review app, Flow can send a notification to your support team and automatically create a ticket in Gorgias so the issue is tracked from the moment it lands.
Customer risk management with LoyaltyLion and Klaviyo. Flow can monitor when a customer account receives an "at-risk" tag in LoyaltyLion. When that tag is applied, Klaviyo's Shopify Flow connector triggers a win-back email sequence automatically. The two tools work together through Flow without requiring any manual handoff between them.
Product launch and order fulfillment alerts with PushOwl. When you publish a new product or fulfill an order, Flow can trigger PushOwl to send a push notification to opted-in customers. Customers who have enabled push notifications get notified the moment the event happens in your store.
These connector-based workflows are where Shopify Flow becomes genuinely powerful for operations running multiple apps. Instead of each tool operating in its own silo, Flow connects the events across your stack and routes the right information to the right tool at the right time.
Connecting third-party apps via Flow correctly requires understanding how each connector's triggers and actions interact with your existing workflow logic. Uncap's B2B App Suite and Flow configuration work goes hand in hand, ensuring the connector logic is built to match your operation rather than generic defaults.
Building Custom Workflows in Shopify Flow
The pre-built templates cover the most common use cases, but they do not cover everything. For workflows specific to your operation, you build from scratch using the same trigger-condition-action builder, selecting from Shopify's library of components and combining them however your process requires.
Custom workflow possibilities include:
- Identifying customers who make purchases above a defined threshold and tagging them for a personalized outreach or discount program
- Setting product variants to automatically receive an urgency tag when inventory crosses a threshold, and removing the tag when stock recovers
- Routing orders flagged with specific product tags to dedicated fulfillment workflows with different handling instructions
- Tagging B2B accounts based on their ordering behavior and triggering sales rep outreach through Slack or email
Shopify handles all the underlying logic. You choose the components. No code is written on your side.
For operations with complex workflow requirements, particularly B2B and wholesale operators managing multiple buyer segments, supplier relationships, and fulfillment paths, a Shopify expert can build and test workflows before they go live. That prevents edge cases in the logic from creating unintended order cancellations or missed notifications at scale.
Put Your Store's Repetitive Work on Autopilot
Shopify Flow does not replace operational judgment. It handles the rules-based, repetitive work that takes time away from the decisions that actually require a person. Fraud flagging, customer tagging, inventory alerts, supplier notifications, rep routing, review management. Every one of those processes runs correctly and consistently, even at 2am on a Tuesday.
For B2B operators managing complex buyer accounts, multiple fulfillment paths, and wholesale-specific processes, the automation layer is where Agentic Commerce thinking starts: your store takes actions automatically based on what is happening in real time, without someone manually catching and processing each event.
If you want help building the right Flow workflows for your operation, or want to understand how automation fits into a broader Shopify B2B commerce strategy focused on AI and efficiency, talk to our experts at Uncap.
Frequently asked questions
Is Shopify Flow free?
Yes. Shopify Flow is a free app available on all Shopify plans: Basic, Grow, Advanced, and Shopify Plus. You do not need to be on Shopify Plus to use it. There is no additional charge for the number of workflows you create or the number of times they run.
What triggers does Shopify Flow support?
Shopify Flow supports triggers across orders, customers, products, inventory, and fulfillment events. The default triggers cover the most common ecommerce events: order created, order fulfilled, customer created, order risk analyzed, refund issued, product created, and inventory changed. Third-party apps that have built Flow connectors can add additional triggers specific to their data.
Can I use Shopify Flow without any coding knowledge?
Yes. Shopify Flow is built as a no-code tool. The visual editor lets you select triggers, conditions, and actions from drop-down menus. Shopify writes the logic behind each component. You assemble the workflow by connecting the pieces in the order you want them to run. No developer is required to build or maintain standard workflows.
How is Shopify Flow different from Shopify Scripts?
Shopify Scripts (now largely replaced by Shopify Functions) runs custom code at checkout to modify pricing, discounts, and shipping options in real time. Shopify Flow runs automated workflows triggered by store events across orders, inventory, customers, and products. Scripts affect what happens at the checkout session. Flow affects what happens in the store and back office after events occur. They handle different parts of the operation and are not substitutes for each other.
Can Shopify Flow connect to apps outside of Shopify?
Yes, through Flow connectors. Apps that have built connector integrations with Shopify Flow can receive triggers and send actions through the same visual workflow builder. Common connectors include Klaviyo for email marketing, LoyaltyLion for loyalty program logic, PushOwl for push notifications, and review apps like Stamp.io and Yotpo. Connectors extend Flow's automation into your full app stack.